Tuesday, September 13, 2011

unit 03 produce craft work


EVALUATION

I produced this piece starting off with a mind map of all the ideas relating to 'I DEMAND'.
I feel that maybe I should have put a little bit more effort into the planning and the production of the idea itself.
The way that I created this image was I found some images on Google including some pictures that I had taken my self personally.
I used the paint tools on Photoshop to create the images that I have now. I used this method because it was very effective and it was a good way make those images into my own in a way. I did the same process with the planet in this image too.

In producing this image I could well have maybe made this image a lot more better had I actually had enough time. I didn't really have enough time to explore the different methods in which to complete this image. So I think if I had the chance to redo this I would have REALLY worked on the detail a little more.

Things that could have gone better with my final piece, I think that I could have maybe made my image so that it wasn't as blurry. I think that maybe I could have spent a little bit longer making the detail in the hands a lot better and maybe have applied another style to this image. Also the glow of the image was suppose to enhance the image in the center of the image But I think that maybe I shouldn't have done as much glow as I did.


We also took an online safety quiz after an explanation by Martial and Marnie on our safety in the working environment. The quiz covered the safety in our posture when working at a computer and other such things like RSI Repetitive strain injury and screen glare causing eye strain.

Unit 02 Explore materials, tools and techniques the support craft ideas.

Unit 02 Explore materials, tools and techniques the support craft ideas:
I have been experimenting on photo shop to find the perfect technique to use in my final design. These include using photo-manipulation and quick sketching on photo shop itself. Here is a quick sketch of the earth that I created on photo shop. This picture of the planet was my first initial experiment because I was practicing the paint tool method of drawing an image on CS5 Photoshop. I find this tool and method to be very effective in the way that it looks in the out come but a negative point I could say about this is that it takes a lot longer to produce than if I was just to REALLY edit a photo or if I was to use a shape tool in the making.


~~~~~~~~~~~~~~~~~~~~~~~~~~~~~~~~~~~~~~~~~~~~~~~~~~~~~~~~~~~~~~~


This is my initial idea. I like the idea of the two hands. As they symbolize 'everyone' in this world and that all cultures are equal and they all deserve the world as one. So this is why they are holding the earth. This is my favourite of the three ideas I produced and have been practicing and creating different versions of this image on photo shop. I'd only gotten to draw a final sketch of this image, the poster mock and my final design for this.


~~~~~~~~~~~~~~~~~~~~~~~~~~~~~~~~~~~~~~~~~~~~~~~~~~~~~~~~~~~~~~~

20/09/2011. This is some experimenting that I've been working on on This image is one of few versions of this idea that I have tried to interpret via photo shop. I feel that this could do with maybe a little less as I believe in the good ol' sayin' ' Less is more ' .. Merely the fact that this looks like it maybe a little over-done. I used the magic wand tool to cut out of a clip-art image of the earth and used a 'Dollar-bill collage' to replace where it used to be. Then I used The burn tool, dodge tool and the paint tool to give the earth the 3D look. The earth and the hands where my initial idea but I thought that the hands and the earth alone looked a little .. lonely, so I added the hands coming from the clouds so that they weren't "just placed" in the middle of the screen. I think that what I did with the hands are really effective because it is really easy to tell that they are suppose to symbolize different cultures. I feel that maybe I should create the earth in this image maybe in the same style that I did with the arms.
Otherwise if everything in this image is in loads of different styles it could start to look messy and all over the place and the whole point of this image is to make the hands and the earth even and belong with each other but at the moment the hands look out of place.. or the earth looks out of place.

This is a modification of my experiment. As a tip from Marnie.
I made the earth look more spherical. The other improvements I have made was the hand also. I got rid of all the white ares in the hand because it looked exactly like the first whit image just inverted. And the impression I wanted to give out was that the two hands where different people representing different races.


POSITIVE~ Positive points that i can say about this image, from my own opinion and opinions that I received in the group feed-back is that it is very visual and straight to the point. It says exactly what it is suppose to achieve which is what I was aiming to do in the first place.

I like out it is laid out. Because it is very simplistic. I also like the concept that everyone is entitled to the earth and that everyone deserves to be equal.


NEGATIVE~It is very dark and grim if the image was suppose to demand something positive I wanted to change it to make it less dark. The flames in this image also made the image look rather dark when the image is again suppose to be demanding something nice and positive and the flames just put the entire image out of place because it was dark and red and Flames always represents death or darkness. With this image too, the improvements I added that made my final piece where that I added at least some skin tone to the hands. Because in this image I don't feel that they where emphasized enough they seemed to be just black and white and the other hand was just inverted version of the white hand. Although this is a simplistic interpretation of different cultures I didn't feel that it was enough.
~~~~~~~~~~~~~~~~~~~~~~~~~~~~~~~~~~~~~~~~~~~~~~~~~~~~~~~~~~~~~~~
These are the source images that I used to create the above images on photo shop.
The picture of the hands that you see where manipulated by tracing them with the brush tool. I then inverted a copy of the drawn image so that there was a negative of the image that I drew which you can see in the image representing a different colour. The two hand colours is a simplistic visual that is suppose to represent everyone in this world.

I created the planet by making a collage of dollar-bills to look like a wall and then duplicated the layer and altered the Hue to make the dollar-bills look blue. I put the picture of the clip-art globe in a layer above it and selected all the green areas of the glob image and used that as a guide-line to erase the blue dollars that where in the green area. I then selected around the planet and did the same thing with the green dollar bills to get rid of the excess dollar-edges. This then created my dollar planet, but the image looked really flat so I used the burn tool and the dodge tool to add shade and reflection onto the planet to make it look like a sphere. I then found an image of two hands around a globe as a template image and used the paint tool to sketch the out line of the image and then did all the shading and the lighting myself as I explained I duplicated them and created a negative. I positioned the two drawn hands around the planet so it looked like they where some-what holding the (Dollar-bill)~earth. As I had a black back-ground because the image was a picture of a globe I felt that a black back-ground of the image was necessary to represent space. Because of this it looked very much like the hands holding the earth in the image where coming out of no where. So I found a picture of some orangy clouds and used just the corner of the image with light opacity so that they weren't a big part of the image and positioned one under the right hand. I then duplicated the image and horizontally flipped it so that there will be an exact reflection for the other hand. The text: I created the text and then made three copies of it. One in yellow, one in red and one in orange. I used the smudge tool on the red text to make some wisps at the top of the text to create a fiery look to it. Then I did the same to the yellow text but I used the eraser tool to erase the middle of the text to almost make the text look hollow, then making the wisps on the orange text also ordered the text so that the yellow was on top with the opacity slightly down, the orange in the middle and the red at the bottom I created the text to look like fire. One I'd merged the three texts I used the eraser tool on very low opacity to slightly erase the bottom of the text to almost give a gradient effect.

~~~~~~~~~~~~~~~~~~~~~~~~~~~~~~~~~~~~~~~~~~~~~~~~~~~~~~~~~~~~~~~

This too I thought was a good idea. This was the idea I came up with when I followed a branch on my spider graph about money.
The image to the left was how I interpreted this image.
The ribbon wrapped around the earth in this image is money.
This is suppose to symbolize that everything in this world is about money, Controversy, poverty, unfair distributions and inside-corruption in the government.
I like this idea because I feel this image hits the nail on the head with the point in it and what it is suppose to symbolize. The reason i did not go with this idea is that I did not really feel that it was suppose to represent money and seemed a little TO simple.
~~~~~~~~~~~~~~~~~~~~~~~~~~~~~~~~~~~~~~~~~~~~~~~~~~~~~~~~~~~~~~~

To be fair with this image I don't really like it very much. Never the less I am still going to try and work on this on maybe photo shop just so that I can get a visual on what this will really look like..
I don't really feel this image says peace. I feel that it just looks like something from a really scary movie.
Though I'm still going to try and get a real visual on this and see how it will really look and judge then if I feel that this is good enough to consider being part of my design. Maybe in the process this idea could adapt into being something a little better.


This is the experiment that I said above that I'll be working on. In my honest opinion I still stand by what I say of the idea. It doesn't really say 'I DEMAND' peace. It just looks like someone has played with a woman's eyes to make it look like from some scary vampire movie. But that is my opinion. I don't really have feed-back on this image because it was a quick experiment I whipped up after the presentation. I feel that maybe the peace symbol should instead of being her retinas, be a reflection in the eye.


I presented these ideas in a group of three and got back a lot of constructive feed-back.
I showed my initial ideas like my original sketches and such. I have yet to work on a final sketch and did not have that to show. But I showed them my first sketches and the ideas I have produced on photo shop with these sketches.

~~~~~~~~~~~~~~~~~~~~~~~~~~~~~~~~~~~~~~~~~~~~~~~~~~~~~~~~~~~~~~~


Feed-back.

Positive feed-back.
It is very visual.
Easy to figure out.
It is quite obvious that the hands are suppose to represent different cultures.

Negative ( constructive feed-back ).
Change the font to look more peaceful and to match the rest of the image.
The text looks to aggressive.
Enhance the hand to make them more visible and to stand out more.
Also to enhance the earth a little more to make it more visible because at the moment in the photo shop mock up it is a little bit too dark.

Tips.
Change the opacity in the money maybe.
Enhancing the earth.
Change the font to look less aggressive.
Enhance the hand so that it is more a part of the image rather than just the back-ground.

~~~~~~~~~~~~~~~~~~~~~~~~~~~~~~~~~~~~~~~~~~~~~~~~~~~~~~~~~~~~~~~
19/09/2011
Today we have been experimenting and practicing our skills on photo shop and learning the different tools. For example our first task was to take a picture of someone with no imperfections off of a search engine or something and basically create imperfections. For example freckles and blemishes/spots change the lighting on their face and such things.
I found a picture of the celebrity Angelina Jolie and changed such things like the shade in her face and gave her some bags under her eyes to make it more natural looking. I also brightened her hair in parts just to show her age a little more.
I also changed the contrast and it made a shiny effect on her face.. Like oily skin. In honesty it made her slightly more natural looking than the original image.
The way I did the blemishes and the faint freckles where with the paint tool but i turned the opacity way down so that these differences where still only slight. I did the bags under her eyes with the same technique and also used the burn tool to make the shading in her eyes to look slightly darker.

POSITIVE~ I'd say that the methods I used where really effective and it really does change her face to look more natural.


NEGATIVE~ I feel that I should maybe have made her skin tone a little more even so that her skin looks a little less patchy so that the image wasn't so obviously tampered with.
~~~~~~~~~~~~~~~~~~~~~~~~~~~~~~~~~~~~~~~~~~~~~~~~~~~~~~~~~~~~~~~


After we did that task I carried on messing with the image and experimenting with tools and came up with a second image of Angelina Jolie. Essentially what I was aiming for this image to turn out to be was merely an elf. I learned surprisingly a lot while creating this image. I learned new techniques. Like instead of using paint to change the colour of an image for example..I used Hue. I learned that this technique is SOOO much easier too. I was having issues with the other way cause I found that the texture of the image was becoming very distorted. I also had some issues getting all of the hair copied so I edited a lot of it to get around it.

POSITIVE~ I like the concept that she is suppose to be an elf. The colour scheme works well. The image colours are limited to the greens and the purples.

NEGATIVE~ I think that maybe I should have cut her out of the first image and planted her in the second one a bit better. As I was met with some challenges to make her hair look more real. I think that also I have the same problem as I had in the first Joli image. As her skin in this image looks a little too bright on one side of the image and a little too dark in the other side of the image. So I could maybe improve that so that the light and the shadowing in this image isn't as emphasized as it actually is.

~~~~~~~~~~~~~~~~~~~~~~~~~~~~~~~~~~~~~~~~~~~~~~~~~~~~~~~~~~~~~~~

The second task that we did today was to find four images .. A back ground. And three objects to go into the image.
I chose a forest like scenery and edited a mini car into it. Also I edited a bird and a rabbit into the image. With this there where some difficulties. For example. Lee taught us the technique of using the select tool and the magic wand tool but the image I chose was almost the same colour as the back ground so I had to do it all pretty much with just the eraser tool. Also I had to somehow clone the image from the back ground and use it to create a reflection on the windows and the shiny surface of the car. After using these techniques yesterday. I find that knowing how to use them makes it easier to become more fluent with them. After about half an hour of experimenting and discovering new tools. I felt that I could find them easy to use for the future. I myself am actually proud with how the image turned out because in a sense it looks almost magical. Improvements that I could make is to maybe enhance the car in some way and maybe make the rabbit more real as it looks rather large. Even though it is suppose to look closer I feel that I should have worked more with editing the shading and the reflection.


POSITIVE~ I like this image as it is very subtle. It isn't obvious that that car doesn't really belong in this image. Also the bird and the rabbit are in this image quite subtly too.
I like that i added some whit specks in the light rays just to give this image the impression that there is a little bit more light than the eye can really see. I also did this by adding a glow around the bird and the rabbit and some reflection on the sides and the windows of the car.


NEGATIVE~ I think that maybe I should have made the car in the image a little lighter so that it is more noticeable or visible. Also I feel that the right side of the wind-screen on the car should have maybe had some more reflection or light because you can see the steering wheel in the image. which isn't a bad thing it's just that this image seems that half of its been erased or something and that is not the impression I want this image to give. I want it to look like the car is part of the whole image.
~~~~~~~~~~~~~~~~~~~~~~~~~~~~~~~~~~~~~~~~~~~~~~~~~~~~~~~~~~~~~~~


21/09/2011

This morning we where showed how to create a flag by texturing a block image.
Firstly we created a colour scheme with the rectangular marquee tool and marked out three colours. Mine is Purple, Yellow and teal. I then used the 'Custom shape tool' to make the Bio-hazard shapes on my flag. I then merged all the layers. I opened a new file and was given a link by our tutor.
This is very useful if I feel that any of my work needs to be textured.

http://www.unsigneddesign.com/fabric4_edited.jpgneddesign.com/fabric4_edited.jpg
This is the image of the fabric that we used to create the texture of the image.
We made this image Black and White (gray scale).
We saved this image in photo shop format.
Going back to the image with the colour scheme we made it fit the image of the fabric by clicking:
Filter -> Distort -> displace.

The image on the left is before the image displacement and the image on the right is after.


~~~~~~~~~~~~~~~~~~~~~~~~~~~~~~~~~~~~~~~~~~~~~~~~~~~~~~~~~~~~~~~

Firstly I chose a custom shape that is like a block shape. And clicked the path tool.
I then opened the text tool and as I scrolled over the path of the shape the text tool automatically changed its route so that it will follow the shape.


This is where you select the path tool. This is so that the text
will follow the shape and will not type as if it would do in a normal text box.


This is more experimentation we did with text. We used the text warp tool to make it the shape that it is..
After this we pressed command button and clicked on the little icon image on the text layer to select the text. Then hid the text layer so that all you could see was the selection on a white screen. Then using the paint brush tool I painted in the selection as the selection would make sure that it would not go further than the lines of the edge of the text. This is where I chose a number of colours to create the text you see on the left that reads " Lololololo ".


This is more typography work that we have completed.
This image that I created on the web-site is hyper-linked to the wordle tool that I used. After you enter this web-site you click ' Create' and then type the words that come into your mind. There is an automatic program that will create this text for you and there is an option to change the design.


~~~~~~~~~~~~~~~~~~~~~~~~~~~~~~~~~~~~~~~~~~~~~~~~~~~~~~~~~~~~~~~


23/09/2011

I spent today practicing on my photography and using these photos on photo shop to practice photo manipulation.
I created two panoramic photos put of the ones that I took using the photo-merge tool.
I knew already how to photo-merge. But I got some information from a web-site because it explains in better detail on how.

~~~~~~~~~~~~~~~~~~~~~~~~~~~~~~~~~~~~~~~~~~~~~~~~~~~~~~~~~~~~~~~

Take pictures for Photo-merge

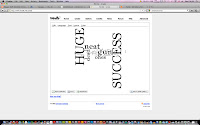
Your source photographs play a large role in panoramic compositions. To avoid problems, follow these guidelines when taking pictures for use with Photo-merge:

Overlap images sufficiently
Images should overlap by approximately 40%. If the overlap is less, Photo-merge may not be able to automatically assemble the panorama. However, keep in mind that the images shouldn’t overlap too much. If images overlap by 70% or more, Photo-merge may not be able to blend the images. Try to keep the individual photos at least somewhat distinct from each other.
Use one focal length
If you use a zoom lens, don’t change the focal length (zoom in or out) while taking your pictures.
Keep the camera level
Although Photo-merge can process slight rotation s between pictures, a tilt of more than a few degrees can result in errors when the panorama is assembled. Using a tripod with a rotating head helps maintain camera alignment and viewpoint.
Stay in the same position
Try not to change your position as you take a series of photographs, so that the pictures are from the same viewpoint. Using the optical viewfinder with the camera held close to the eye helps keep the viewpoint consistent. Or try using a tripod to keep the camera in the same place.
Avoid using distortion lenses
Distortion lenses can interfere with Photo-merge. However, the Auto option adjusts for images taken with fish-eye lenses.
Maintain the same exposure
Avoid using the flash in some pictures and not in ot hers. The blending features in Photo-merge helps smooth out different exposures, but ext reme differences make alignment difficult. Some digital cameras change exposure settings automatically as you take pictures, so you may need to check your camera settings to be sure that all the images have the same exposure.

Create a Photo-merge composition

  1. Do one of the following:
    • Choose File > Automate > Photo-merge.

    • In Adobe® Bridge, choose Tools > Photoshop > Photomerge from the Bridge menu bar. Skip to step 5.
      Note: In Bridge, choosing the Photo-merge command use s all images currently displayed in Bridge. If you only want specific images used, select them before choosing the Photo-merge command.
  2. Under Source Files in the Photo-merge dialog box, choose one of the foll owing from the Use menu:
    Files
    Generates the Photo-merge composition using individual files.
    Folders
    Uses all the images stored in a folder to create the Photo-merge composition.
  3. Specify which images to use by doing one of the following:
    • To select image files or a folder of images, click the Browse button and navigate to the files or folder.

    • To use the images currently open in

      Photoshop, click Add Open Files.

    • To remove images from the Source File list, select the file and click the Remove button.

  4. Select a Layout option:
    Auto
    Photoshop analyzes the source images and applies either a Perspective, Cylindrical, and Spherical layout, depending on which produces a better photo-merge.
    Perspective
    Creates a consistent composition by designating one of the source images (by default, the middle image) as the reference image. The other images are then transformed (repositioned, stretched or skewe d as necessary) so th at overlapping content across layers is matched.
    Cylindrical
    Reduces the “bow‑tie” distortion that can occur with the Perspective layout by displaying individual images as on an unfolded cylinder. Overlapping content across files is still matched. The reference image is placed at the cent er. Best suited for creating wide panoramas.


Applying Cylindrical Mapping
A.
Original
B.
Cylindrical Mapping applied
Spherical
Aligns and transforms the images as if they were for mapping the inside of a sphere. If you have taken a set of images that cover 360 degrees , use this for 360 degree panoramas. You might also use Spherical to produce nice panoramic results with other file sets.
Collage
Aligns the layers and matches overlapping content and transforms (rotate or scale) any of the source layers.
Reposition
Aligns the layers and matches overlapping content, but do es not transform (stretch or skew) any of the source layers.
Select any of the following options:
Blend Images Together
Finds the optimal b orders between the images and create seams based on those borders, and to color match the images. With Blend Images Together turned off, a simple rectangular blend is performed. This may be preferable if yo u intend to retouch the blending masks by hand.
Vignette Removal
Removes and performs exposure compensation i n images that have darkened edges caused by lens flaws or improper lens shading.
Geometric Distortion Correction
Compensates for barrel, pincushion, or fish-eye distortion.
Click OK.

~~~~~~~~~~~~~~~~~~~~~~~~~~~~~~~~~~~~~~~~~~~~~~~~~~~~~~~~~~~~~~~

Following the instructions above that I got from http://help.adobe.com/en_ US/photoshop/cs/using/WSfd1234e1c4b69f30ea53e41001031ab64-75e8a.html
The images below where the results that I got.

POSITIVE~ Both of the images where very well stitched and there is no mistake with the stitching that I can see.


NEGATIVE~The image of the pavement was merely an experiment so there is not much good that I can really say about it. Panoramic photos are normally three photos stitched from the center image the left and the right one must but no less than forty degrees. I feel that this is the only thing I should have taken note. This isn't a mandatory thing but it will help with the stitching. In the image of the pavement I did not take three photos. I took five in the hope that they will stitch correctly. This isn't the wrong way to do it or the right way to do it. But it was the way that I was taught in photography and feel that this is the way that I should have followed. But as I did not have a tripod that day it would ha ve been harder to do it the correct way.

~~~~~~~~~~~~~~~~~~~~~~~~~~~~~~~~~~~~~~~~~~~~~~~~~~~~~~~~~~~~~~~

26/09/2011

Today we are starting on our final pieces.
I saved my last work that I did as a JPEG so I was met with some difficulties copying some layers from my last design. So I used the lasso tool and copying the image of the hand. The image to the left is the i mage that I used and how I selected the image that I'd previously drawn.


Using the eraser tool I erased all the edges of the image so I wasn't l eft with the rough cut out look from the other image. After I did so I duplicated the layer and selected Edit > Transform > Flip horizontal.
This gives me an identical version of my original hand. This I can use as th e other hand. In the image to the left I hadn't actually placed the other hand yet.


After I'd repositioned the hand and put the layer with the planet image on view the image looked like this.
<<<
The hand to the right is in the beginning of another process. I had to erase everything in the center of the hand so that it was left with just an out-line. This was because it was an exact copy of the other one just flipped. And the shading and the highlights where all in the wrong place and the image would not have looked right at all. So once I erased all of the shading in the other hand, being careful of the out-line. I added new shade and reflection.. But as if the shade was to the right and the highlights where to the left. I also lig htened some of the shade on the left hand because there was a dark patch on the left side of the hand and that was where the light was actually coming from.

After I changed the shade on the hands using the eraser tool, pa int tool an d the dodge and burn tools I added some skin tone to the right hand. Using the paint tool I selected colourize ( colour) and shaded in the hand. I used the dodge tool to add the highlights to the hand afterward and used the burn tool to edit the shading some more. I did the same with the hand on the rig ht. To add the highlights though I tried to use the dodge tool and it wasn't working out too well. The colour i used to create the hands skin-tone turned red. So I used the eraser tool on a very low opacity to create all of the highlights. On this image you see that a lot more has also been done to it. I created a sky-blue back ground and added a glow around the image of the planet and the hands. This was to emphasize them more and to make them stand out a lot more.

POSITIVE~ The image after all of the improvements looks more lighter and less agressive. The hands now have some form of tone to them so they are more recognizable as hands.
The text fits the shape of the globe so it isn't some invasive text that is covering anything or isn't over-lapping anything.

NEGATIVE~ I could have worked more with the glow to make it look more emphasized. I could possibly change the blue to a more purpley blue. Just to give it a more warmer look.
I need to work on the hands a little more because it doesn't look like the light in the image is actually coming from a specific direction.

~~~~~~~~~~~~~~~~~~~~~~~~~~~~~~~~~~~~~~~~~~~~~~~~~~~~~~~~~~~~~~~

[I've hyper-linked the image below to the source website that I got this information from.]

1. Create a new document and use the "Text" tool (T) to create a line of text.
2. Apply a "Polar Coordinates" filter. When warns that the text will be rasterized, click OK.


3.
In the "Polar coordinates" dialog, select "Rectangular to Polar" and click OK.


4. Your text is now curved but isn't proportional.

5. Use the "Transform" tool (Ctrl+T) to increase the height


6. Re-size the text so that it fits in the document.


Here is my result to the instructions above.

<<< This WAS going to be the method to be the heading of the image. But after playing around with photoshop for a short while I found that it did not really suit the image as I'd hoped.

I decided to go for a text box heading and selected the letters as I did when I created the "lolololo" image. and used the white brush tool to create the second text. Then used the blue colour brush on a lower opacity to make the text blue. I had to use the white brush tool to make the glow around the text and merged the text and the glow. I the deleted the original text and was left with the text that I'd created. I then clicked Edit> transform. Warp to change the text to the current shape that it is now.


~~~~~~~~~~~~~~~~~~~~~~~~~~~~~~~~~~~~~~~~~~~~~~~~~~~~~~~~~~~~~~~

This is my final outcome from all the sketches and mind maps that I produced.
There was a problem with adding more images to this blog so here is a link to the first final design before all of the improvements.
https://blogger.googleusercontent.com/img/b/R29vZ2xl/AVvXsEhCP_S5hdFeDZjDU1KPRIspSPBvTbaSNduGyZN3jEivBYZsP5Qni0eQr0EWRcsBtDw-mHR1u3cW0BNDlNLiXMWNf90NQg-64TTqRdLyIpgbajFlmGlPwsXc0VksjSSWlH4LWZ1XTfY5qCo/s1600/Final+stuff+first.jpg

This is the first ever design based on this idea.
https://blogger.googleusercontent.com/img/b/R29vZ2xl/AVvXsEiEkJpb1W3EANNxwK0yGZUQIObfep4KJBiiwPT_qRajn2jzNoIf-wi8VSG26cqDPgQ7lamtX_Wx826jNJ1pW1EDhyphenhyphenTYnDuXdykTGiQyFidm-Ahu_qhn8mVJM9iPYswnvvS_OEr9izYHOlg/s1600/World%252C+Equality.jpg
And the first ever idea improved after some feed-back I received on some improvements I could consider.
https://blogger.googleusercontent.com/img/b/R29vZ2xl/AVvXsEjUWFNxIdutQdlKr8Hj2oYzoiUgAE4xyJIm5i6M6oyfZImyBduK8MYaWgVQXr-GXu0FXnA8YIqvBK32ja5zwKQpZbgrZNWUjMnxojlIbWPdpNdOyV56e9y9qDPlnEm6aW_TraJ5I2VWEo0/s1600/World%252C+Equality+1.jpg


~~~~~~~~~~~~~~~~~~~~~~~~~~~~~~~~~~~~~~~~~~~~~~~~~~~~~~~~~~~~~~~

TIME PLAN.
12/09/11
I researched 4 digital artists and a piece of each of there work.
Then I analyzed their work describing the good points the bad points what I think could have been done better what I think is fine the way it is. I also wrote about their techniques, colour use, composition and what effect the specific piece has on me myself.


13/09/11
I produced my ideas and concepts and my sketches.
I used spider-graphs to produce my ideas and drew up three sketches following three of the branches from my spider-graphs.


14/09/11
We presented these idea and mock ups of the idea that we had so far and documented the feed-back we received about our work. We also gave feed-back about other peoples work. And shared input with-in a group of around three.


14/09/11-20/09/11

I have been creating mock ups and experimenting on photoshop using many tools and learning about the different ways they could work. Creating lots of different little projects to help us with this one.


21/09/11-27/09/11
In this time I have been creating my final design, putting my ideas on screen and producing them via CS5 Adobe Photoshop.

27-09-11

I have to print final output.

unit 01 Research and Develop craft ideas.


This is my spider-graph's. I didn't produce very much on them. Because while doing it I though of the idea in doing it in a list. This helped me quite a lot. As I could put them into separate lists and focus on specific subjects easier.
( List at bottom of post )


This image is also web-linked to the web-site guide-lines. ( I'm not sure when this link will expire-if t will)


"Then send them in high quality,300dpi, rgb, jpg"

  • don't include self promotion items, spam, internet addresses, emails, watermarks, company logos, or overprints on your artwork.
Just send artworks as requested. Other si
zes can't be accepted.
The use of our logo ( Revolution art)
in your art is welcome.
The theme is " I DEMAND" .. There is a small paragraph on the website explaining what they are looking for in a design.


" What would you ask world leaders to do in order to improve our planet? What should they do to address injustice and human rights violations, the uneven
distribution of resources, poverty, border policies, economic crisis and the many other problems that remain un-resolved?
In our next edition we will provide the platform from which your demands can be made and heard throughout the world."


The Dead-Line is September 15th , 2011.

Although, I will be completing this by a later dead-line that my lecturer has set me.

(Group work)
We developed idea through research of the past 'REVOLUTIONART' covers and through a spider-graph that was passed around the room so we weren't only having the limited input of just our group alone but hearing other peoples ideas throughout the room. In my opinion this was really helpful and helped me get a grasp of the ideas needed for this project. We then each chose a branch from the spider-graph E.g I chose: Freedom--> Speech --> Freedom to go out E.c.t.
We then spoke about each of the branches we chose and why we chose them and then drew up some sketches each of some concepts to do with the branch we had chosen.
After we spoke about our sketches and had looked at them all we chosen one and began to experiment with the ideas drawn on photo shop CS5 this is where we came up with further more better ideas. We then created a word file with our development and research.

(Individual project)
I developed my ideas the same way we did in the
group work starting with a spider-graph. It helped that i did do it in a group first because then I knew what sort of things I could do in my work. Also the feed back from the group work also helped.
That being because there was some constructive criticism that helped me to guideline my work and gave me some things to think about before
creating my work. For example our piece was to demand freedom but for the title out piece seemed a little too peaceful and mellow and there are some other things said about other peoples work.
I did a number of sketches portraying essentially what I think of a word or if I say the word that is on the spider-graph I draw how I see this image. I came up with roughly three - four designs and I am currently in the process of choosing which I feel is appropriate for this piece. In the mean-time I have been experimenting with photo shop and
the different techniques and trying to find what style I'd like this image to be in.


Analysis: Artist research.1

It was created by Nathalia Suellen.

I personally didn’t know enough photo manipulation artists to search. So the source of this image was a Google search:

“Artists of Photoshop”.

Source: http://artistsofphotoshop.com/2011/07/nathalia-suellen/

The artist of this image has manipulated an image of a woman holding some sort or tribal looking jar in what looks like a forest perhaps?

I think there is somewhat seriousness in this image as it’s very natural and has a whimsical or surreal feel to the image. Because say her hair practically blends with the atmosphere and becomes what looks like the roots of plants growing up trees. Also there is what would usually be a large parrot but a small one flying either in the distance or maybe towards the woman’s face, Maybe the artist could have possibly worked on it a little bit more so that viewers can get an easier grasp of the activities going on in this image.

By what I can see in this image there must be a significant importance to the woman in this image or maybe the object in her hand the way she morphs into the tree via her hair almost

suggests that she could be maybe a creature or deity of the forest and maybe that she is some-how ‘communicating’ with the parrot.

I’d say that maybe to woman and the tree where once a separate image to the forest as the forest has more lighted appearance. Also it is quite apparent that the objects that say her hair morph into where possibly edited too, or maybe placed there in post-production.

The use of colour shows that the image is very natural as it is filled with all thing nature and very cool colours are used in this image. [Green and Light-turquoise] There are very few things in this picture that are coloured blue like the edges of the image which kind of look like the corners of the image have been burned with this colour, also her nails and the decorative things in her hair. There is very little blue on the wings of the parrot too. In my opinion I guess this is done intentionally so we focus more to the left of the image too and focus a little less to the right. Also studies show that when someone looks at an image due to the nature of reading it’s become a forced habit to look at a said subject from the left to the right so the woman and the tree maybe have been placed to the left to suggest that maybe she is what we are supposed to be focussing on.

The image is some-what dark. This maybe because it is in the forest and that kind of atmosphere in reality is normally some-what dark anyway. The lighting on say her face and the jar in her hand I would say are very accurate but maybe not emphasised enough. It seems that the artist have also included that the colour of the light is the colour of the reflection on her face as the colour of the lighting seems to be pretty much the same as the reflection shown on all of the image objects.

The impact it had on me was I thought it was very interesting the colours and the lighting where very accurate. The only thing I can mention to maybe improve the image would, like previously mentioned, would be the bird. It looks like the lighting and the shade aren’t too accurate in this image. I cannot really tell if the bird was flying in the distance or a bird flying very close but due the nature of this image a very small parrot could be expect. So maybe the artist could have emphasised the bird’s purpose in being there.

I’d say the image was supposed to be peaceful and mellow. It has a very ambient feeling to it.

ANALYSIS: ARTIST RESEARCH.2

It was created by Josh Thomas

Source: http://artistsofphotoshop.com/2011/04/josh-thomas/

In this image it looks like that the artist has maybe created an element leaving the earth? Underneath what looks like an element/ transportation-shuttle possibly looks like a road or even a run-way?

I think there is suppose to be a significant meaning in this image what I guess in my own opinion is it could possibly be a warning or a threat to what is being done to our planet? Or it could suggest this is what we are leading to. My second idea to what this image could symbolise is maybe just the creativity of surrealism.

The nature suggests that maybe this was once a core image of just a background manipulated to look like space or another world and the other objects in this image~ [The earth, the lump of earth descending from earth and arriving at what looks like a run-way or a road.] ~Where maybe just planted on top, via Photoshop.

The lighting in this image is very dark and very dull, except certain high-lights of blue, the small lump of earth coming towards the road. There seems to be a pretty accurate perception in the image. If you where in this situation seeing such a view, that would be the lighting and the shade you’ll see. There is reflection in the road below the glow of the object in the air, but it doesn’t seem to be enhanced enough. The road if good quality would be of somewhat smooth surface and the glow given seems to be very bright as the glow received on the road seems to be just a taint-glow and very dull when in reality there would be sharp reflection in every nook and cranny of the road.

There is very good detail in the image. The texture of all earth elements seem to be properly mannered like the smaller globe looks earthy, muddy, cracked and looks how it should. Obviously the earth will be a memorable symbolic view of the earth because it’s what we live on, it’s well known. So if this artist did produce a bid image to perceive the view of the earth. I’m sure it would be picked up on as it is so many things that this image of our globe symbolises in everyday life.

The colours in this image compared to the image’s darkness are very different; they are mainly blues and greens. When I see these colours I see the cover of a CD for music specialising in ambience or I think about peace and all things nature. Though the colours seem to be so peaceful the image itself looks threatening like “This will happen to your earth”. It looks like a warning which interests me how this artist has managed to make me perceive this with such cold and peaceful words.

This image had great impact on me and my reason for picking this to analyse. It is an interesting concept. It’s very futuristic because things seem like they are “just” coming and going from the earth like it is some everyday activity. In a sense it makes you look forward to things like this.

ANALYSIS: ARTIST RESEARCH3

Source: http://artistsofphotoshop.com/2010/08/marcell-bandicksson/

It looks like that in this image the artist tried to create an image of maybe a tree morphing into a guy’s hand or maybe the other way around?

He’s created a sense that maybe the guy is into the nature.

It looks like that in this image the guy used an image of a hand and maybe toned down the opacity to a selection of it so it gives the impression that the trees are really coming through his hand. This is a good idea and really interesting but I don’t think that it was given as much time and effort. It was essentially the easy way around maybe of creating such an image. I personally would have maybe did things with maybe the same image but separately not just blended the two photos and hid the evidence by a load grain filters.

I feel that I need to be a lot more critical of this piece than I have the others. Mainly because I feel that I should choose to analyse a piece that I do not like as much as the rest so I’m not picking them for an easy ride. I like to take time to accept and make challenges. Which I think that is what this artist should have done.

The lighting and shades I’ll say are a little too dark it’s great that there is colour in the hand and a little leaf in this image. But it does not look like they have thought about shading, lighting or colour schemes. The pink from the hand doesn’t really come from the green of the only small plant growing from the hand. And most of the plants around the hand don’t even look like they are part of the hand it just looks like an object planted around and in my honesty it is essential that they should have made those plants more about the hand than any of the other points I have brought up. Purely as the hand is THE subject. It is THE main focus point. It is the part of the image that people are going to view and judge.

All-in-all the impact it had on me was not very much because I feel they should have used a better technique to produce. But I do not disagree with the ideas and the concept.

ANALYSIS: ARTIST RESEARCH.4

Source: http://artistsofphotoshop.com/2011/06/kuang-hong/

The artist has created an image set in the forest or by a water-fall, in this image there seems to be a giant character; possibly a robot, or made of rocks and elements from this forest. By this characters size and maybe posture it kind of says that maybe he isn’t a people person or that maybe he is one of a kind but then it also makes you wonder why there is an elf-like creature with a bow watching. Maybe he is hunting? If this is so them maybe this creature isn’t so much of a one of a kind. In the environment that this creature is in and the way he blends so much with his back-ground and just the plain gormless look to his face suggests that maybe he is just a harmless little ‘BFG’ or maybe something that is somewhat similar. And the way that this creature is holding a stick or due to the size of him, a tree? Almost seems that this character may have the characteristics of that of a dog; a sense of innocence?

The image looks like that is may have been almost completely a photo manipulation; based on the softness on the threes or the almost animated look to the rocks and the water. The water looks almost like a long exposure photograph this could have been done intentionally just to make it feel like a forest make it feel ‘magic’. The entire image looks like it could have been painted by a very skilled fine-artist.

The lighting shining through the trees look they have been placed so intentionally to let this creature type character to dominate the image and since the other character is ‘lurking’ and is trying not to be seen by the other character, they’ve put him in the dark like he wants. So the characters and objects look like they have been carefully placed intentionally for us to turn our attention more to the stone/robot like character.

The colours used in this image have also been purposely controlled. As we can see there are many things in this image that could be a wide range of colours like water has that typical shade of blue, the elf-like’s clothing and many other things. But you can see that the person has tried so hard to stick to different shades of green, black and white. This is why I take much interest in this image, because it was so well thought-out. I guess the robot like creature being portrayed as being blended with his environment shows that they could be hunting.

This image had an impact on me because it is almost spiritual but at the same time dark. It’s so mysterious makes you think “Who is the good or bad guy in this image?”, “What is the creature?” “Why is the elf-like creature skulking around the tree?”


RESEARCH ANALYSIS TEMPLATE

Composition

Use of colour

Use of light and shade

Impact

Analysis:

The artist has manipulated a Star-ship into an under-ground car-park. He has used the Star-Trek logo to give the viewer a context for the image. There-fore a futuristic impression is being given.

The artist has used humour in this image, by the placement of the star-ship in the garage.

He has created a relationship between the man and the Star-ship, by the use of the remote key that the man is operating and has created an impression that the man is travelling by including a suit-case.

Techniques:

Within the image, the main lighting is central and over-head so that the Star-ship is well lit and dominating the image; Giving it great importance.

Assuming that the main components of the final image where separately sourced~ I.e. the base of the car-park image, the Star-ship and the man with the suit-case, the Star-ship and the man would have been cut out and placed on the car park image. The edges or these two components are slightly softened and multiple shadows applied; to match the multiple sources of light; from overhead and reflected from surrounding objects.

The general lighting is warm; which implies safety and comfort, this is in opposition to the weapons on the Space-ship. Perhaps travelling with weapons is normal in the futuristic age that this image depicts?

There would appear to be a need of a shadow from the main nose part of the Air-ship, from the over-head lighting.

The lighting reflecting on the man and the Air-ship is in line with the over-head light.

The image contains strong blue elements; the base of the pillars and the suit-case, along with the warmth of the orange Star-ship alarm lights, this draws your attention to the lights, which emphasises the normalcy of the situation; we are used to seeing orange alarm lights.

In terms of impact, the image demonstrates irony; within a futuristic scene one could expect to see a big shiny artefact, but the shit depicted is small, personal transport and seemingly common-placed.

Also humour is depicted in the casual approach of the traveler to the ship.

The image has a mysterious feel to it~ Why is the ship there?


I did my spider-graph and a list form because it helped me to separate the different routes from the graph.

I DEMAND

· Peace

Equality--> Not fighting--> Non-violence.

· Equality

Equal rights to ‘Everyone’.

Racial differences-->lead to war about religion or supplies.

· War

Fighting about things such as supplies [food, water].

Racial differences, Religion.

Riots.

· Money

Not enough of it to share --> Power--> Government--> Corruption in the government --> Africa.

· Freedom

Freedom to speak --> Freedom to leave homes [domestic abuse]--> Barred/caged [animal abuse]

· Food

Unfair distributions--> E.g. Africa. They are starving while countries like America aren’t.